

Photo by La-Rel Easter on Unsplash
Updating and Deleting Selected Records in Read-Only JET Table (Part - 2)


Hello All. Hope you all are well and good. In this blog, I will discuss how you can update or delete a record in a read-only Oracle JET table once you have inserted a new record in it.
In my previous blog Inserting New Records in Read-Only JET Table (Part - 1), I showed you how you can insert a new record/row into a table. We will continue with the same design to see how the update and delete operation works on a record in a read-only table. We will use the same structure here as well. From my previous blog, you have already created an ADP variable for your table, you have assigned a custom type to this ADP variable and you also have defined an object type variable that uses the same custom type as its default type. You also have defined a custom type for your table columns. In my previous blog, if you have not understood why have I created another variable for table columns then don't worry. I will explain the reason behind it. In general, when we add JET Table in Visual Builder page, we simply move to Data property in Properties window, map the ADP which we have defined and then populate the columns that we need using the same ADP. This approach will work if you want to keep your table structure simple.
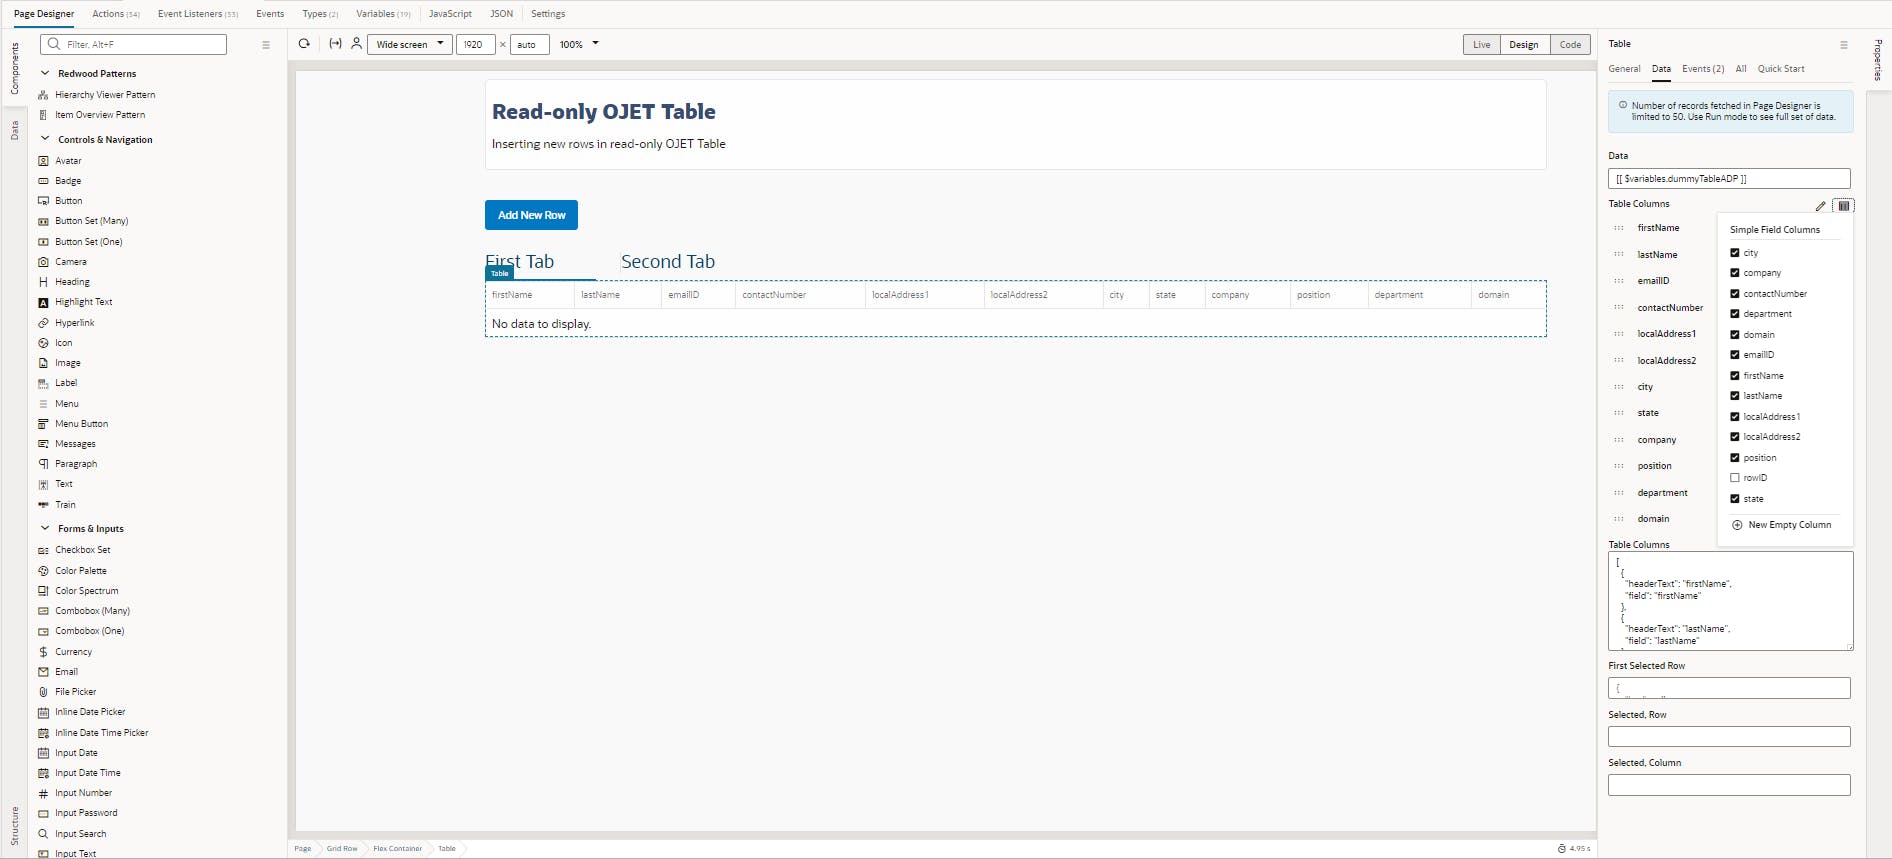
But in case of additional complexity like editing a row or deleting a row or want to add a checkbox on each row, or you want to populate table columns based on tab selection, then this approach might not work for you. In this case, it is much easier to define a variable of an array type that will populate all the columns for your table. There are two approaches with which you can populate table columns with additional customization such as frozenEdge, headerStyle and style. The first approach is the use of an external JavaScript file and the second approach is defining a variable of array type and populating your table columns. For simplicity, we are going to follow the second approach.
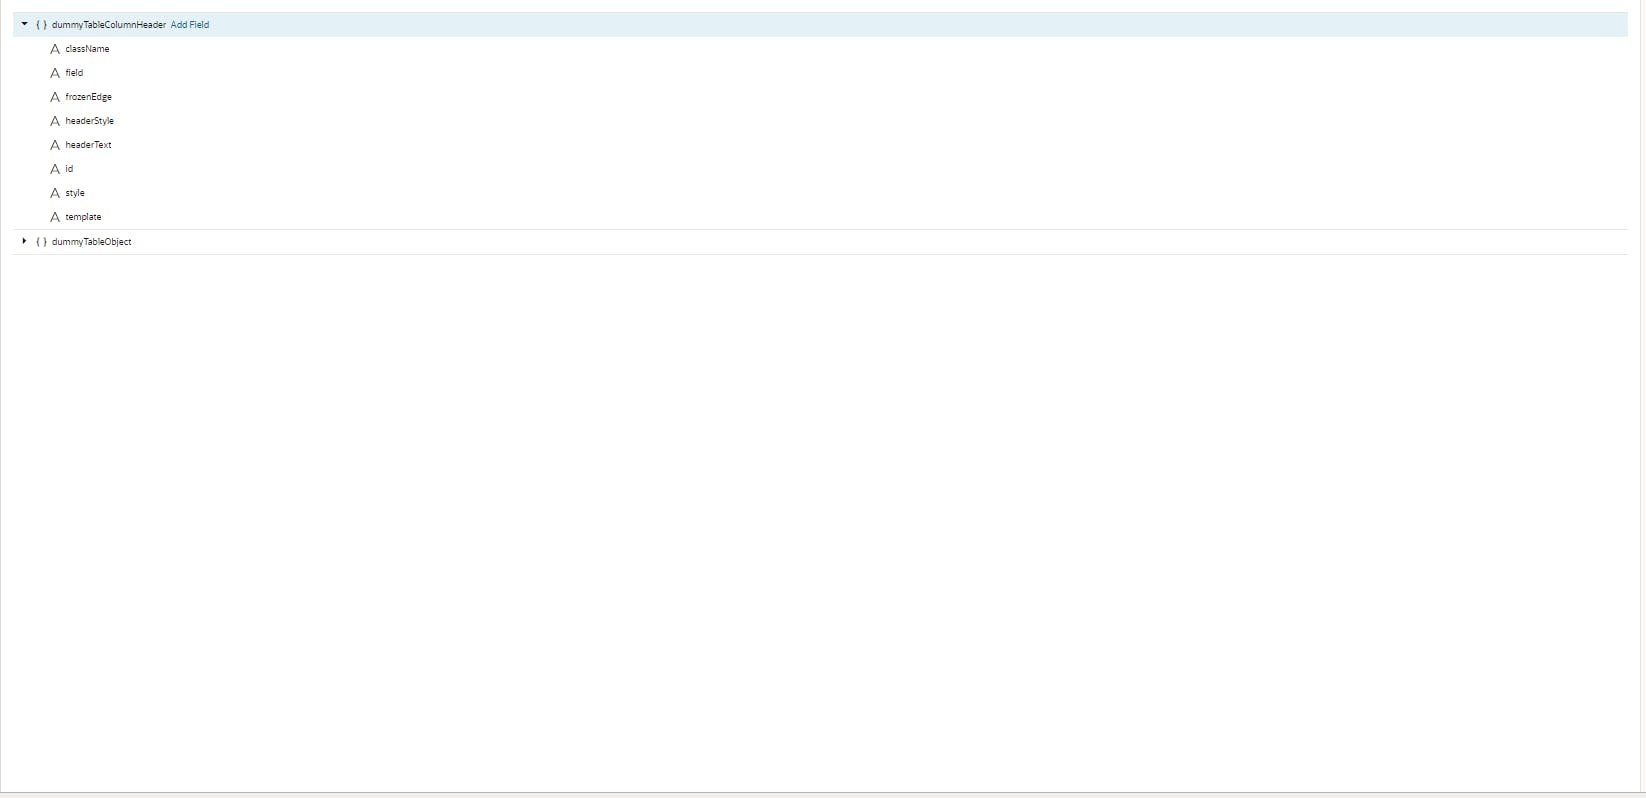
For the second approach, you have to create another custom type which will have these table header-level fields - headerStyle, headerText, field, frozenEdge, style, className, and template. These are table column header-level properties that you can see in Properties window of Oracle JET Table.
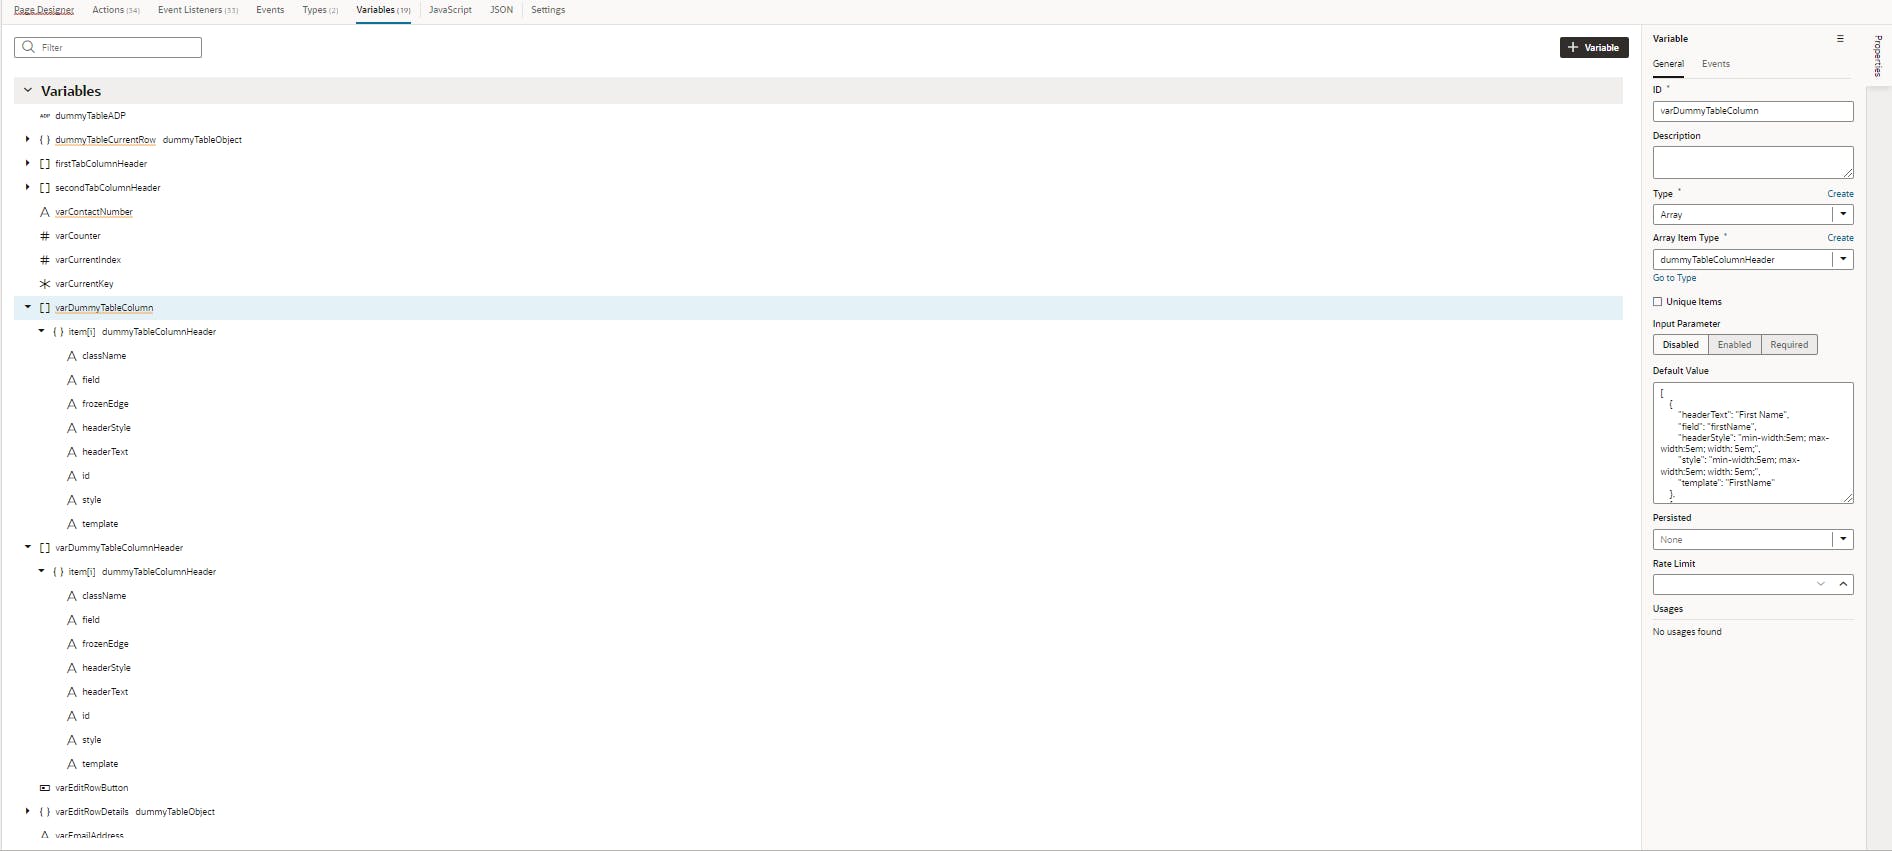
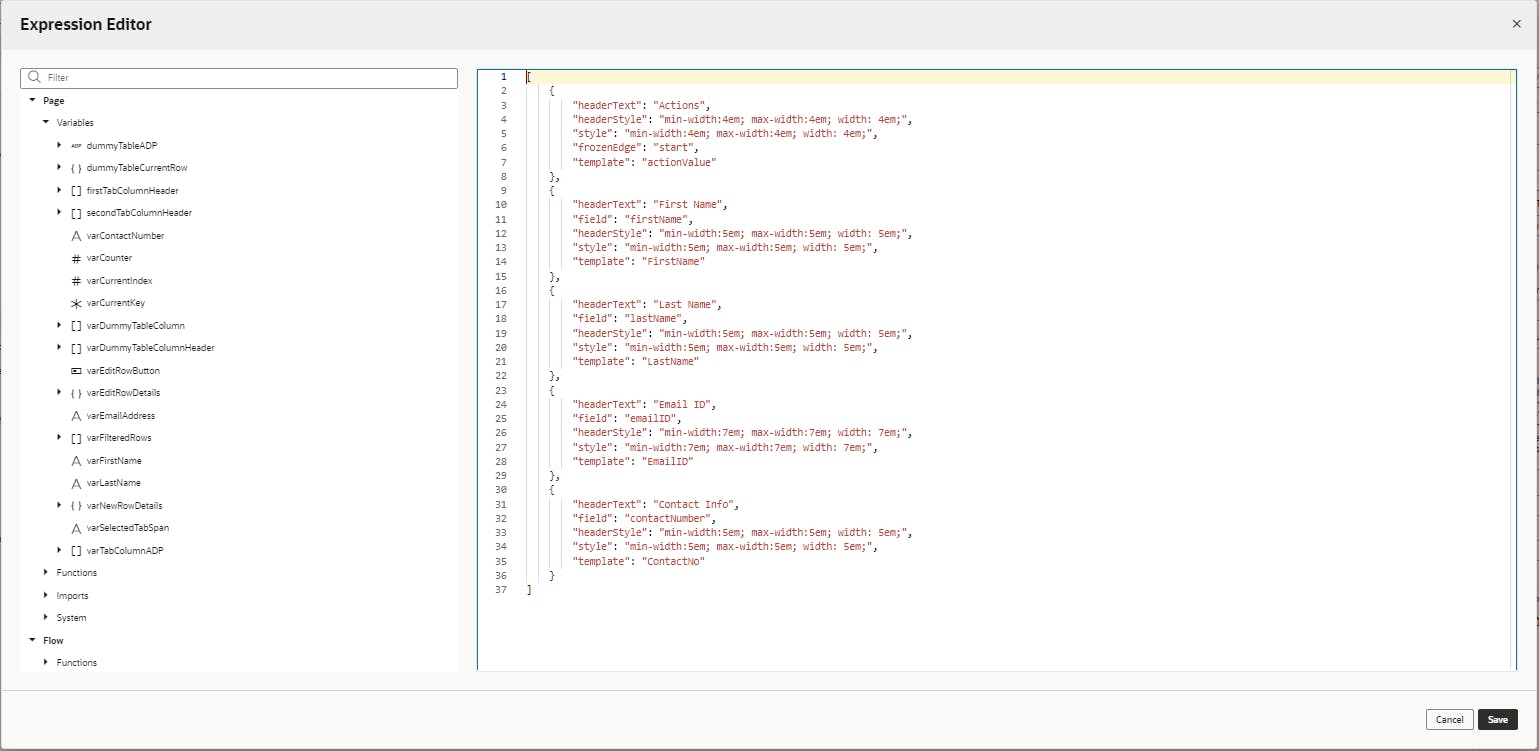
Once, you have created this custom type for table header, go to the variables section of the page and create one variable of array type namely varDummyTableColumn. Map the Array Item Type property from object to the newly created custom type as shown below. Next, come to Default Value property and click on fx (expression mode) to open expression editor window. Once, expression editor window opens up, define all the default columns in array of object form as shown in below screenshot. One thing you will notice here is, I am defining a column called "Actions" without actually defining its corresponding field in ADP type. This feature is called the dynamic insertion of the column(s) into the Oracle JET table without actually defining its field. We will use this column to perform edit and delete operation of a row. Also, you will notice that, for Actions column I have used frozenEdge property. This is a feature of JET table where we can set how many columns need to be fixed in position when moving from one tab to another. For example, if you have defined three different tabs to populate different columns of a table and you want one or two columns to remain fixed all the time then you can use frozenEdge property. This property when applied will make one or more columns to be frozen/fixed in position in JET table. You can also refer Oracle JET cookbook to know about frozen columns Frozen Columns in Oracle Jet Table
After the assignment of default columns, the next thing we are going to do is map this variable varDummyTableColumn to the column property of JET Table. Come to the page designer section where you have defined your table and replace the column property value with this value.
<oj-table scroll-policy="loadMoreOnScroll" class="dummyTable" data="[[ $variables.dummyTableADP ]]"
      columns-default.resizable="enabled" columns-default.sortable="disabled"
      columns="{{ $variables.varDummyTableColumn }}" style="min-width: 100%; max-width: 100%; width: 100%;"
      id="tableDummyTable" on-first-selected-row-changed="[[$listeners.tableDummyTableFirstSelectedRow]]"
      selection-mode.row="single" horizontal-grid-visible="enabled" vertical-grid-visible="enabled" display="grid"
      on-selection-changed="[[$listeners.tableDummyTableSelection]]">
Once this is done, we will add two oj-button components for the Actions column. One for Editing a record and one for Deleting a record. You can either use <template> reference of the JET table from Oracle JET Cookbook or you can use <tr> <td> reference of the JET table. I am using <tr><td> reference, since I am comfortable with this approach.
<oj-table scroll-policy="loadMoreOnScroll" class="dummyTable" data="[[ $variables.dummyTableADP ]]"
      columns-default.resizable="enabled" columns-default.sortable="disabled" scroll-policy="loadMoreOnScroll"
      columns="{{ $variables.varDummyTableColumnHeader }}" style="min-width: 100%; max-width: 100%; width: 100%;"
      id="tableDummyTable">
    <!-- Common Column -->
    <template slot="actionValue">
        <oj-button :id="[[ 'buttonEditRow-' + $current.index ]]" class="oj-button-sm" display="icons"
              chroming="borderless" disabled="[[ $page.variables.varEditRowButton ]]"
              on-oj-action="[[$listeners.buttonEditRowAction]]">
              <span slot="startIcon" class="oj-ux-ico-edit"></span>
            </oj-button>
            <oj-button :id="[[ 'buttonDeleteRow-' + $current.index ]]" class="oj-button-sm" display="icons"
              chroming="borderless" disabled="[[ $page.variables.varEditRowButton ]]"
              on-oj-action="[[$listeners.buttonDeleteRowAction]]">
              <span slot="startIcon" class="oj-ux-ico-delete-circle"></span>
    </template>
    <!-- Column Population based on Tab Selection -->
    <template slot="FirstName">
       <oj-bind-if test='[[$variables.varSelectedTabSpan==="firstTab"]]'>
        <oj-bind-if test'[[$current.mode==="navigation"]]'>
            <oj-bind-text value="[[ $current.data ]]"></oj-bind-text>
        </oj-bind-if>
       <oj-bind-if>
    </template>
    <template slot="LastName">
       <oj-bind-if test='[[$variables.varSelectedTabSpan==="firstTab"]]'>
        <oj-bind-if test'[[$current.mode==="navigation"]]'>
            <oj-bind-text value="[[ $current.data ]]"></oj-bind-text>
        </oj-bind-if>
       <oj-bind-if>
    </template>
    <template slot="EmailID">
       <oj-bind-if test='[[$variables.varSelectedTabSpan==="firstTab"]]'>
        <oj-bind-if test'[[$current.mode==="navigation"]]'>
            <oj-bind-text value="[[ $current.data ]]"></oj-bind-text>
        </oj-bind-if>
       <oj-bind-if>
    </template>
    .
    .
    .

    <template slot="City">
       <oj-bind-if test='[[$variables.varSelectedTabSpan==="secondTab"]]'>
        <oj-bind-if test'[[$current.mode==="navigation"]]'>
            <oj-bind-text value="[[ $current.data ]]"></oj-bind-text>
        </oj-bind-if>
       <oj-bind-if>
    </template>
    <template slot="State">
       <oj-bind-if test='[[$variables.varSelectedTabSpan==="secondTab"]]'>
        <oj-bind-if test'[[$current.mode==="navigation"]]'>
            <oj-bind-text value="[[ $current.data ]]"></oj-bind-text>
        </oj-bind-if>
       <oj-bind-if>
    </template>
</oj-table>
<template slot="rowTemplate" data-oj-as="row">
        <tr>
          <!-- Common -->
          <td>
            <oj-button :id="[[ 'buttonEditRow-' + $current.index ]]" class="oj-button-sm" display="icons"
              chroming="borderless" disabled="[[ $page.variables.varEditRowButton ]]"
              on-oj-action="[[$listeners.buttonEditRowAction]]">
              <span slot="startIcon" class="oj-ux-ico-edit"></span>
            </oj-button>
            <oj-button :id="[[ 'buttonDeleteRow-' + $current.index ]]" class="oj-button-sm" display="icons"
              chroming="borderless" disabled="[[ $page.variables.varEditRowButton ]]"
              on-oj-action="[[$listeners.buttonDeleteRowAction]]">
              <span slot="startIcon" class="oj-ux-ico-delete-circle"></span>
            </oj-button>
          </td>
          <!-- ko if: $variables.varSelectedTabSpan === "firstTab" -->
          <td>
            <oj-bind-text value="[[row.data.firstName]]"></oj-bind-text>
          </td>
          <td>
            <oj-bind-text value="[[row.data.lastName]]"></oj-bind-text>
          </td>
          <td>
            <oj-bind-text value="[[row.data.emailID]]"></oj-bind-text>
          </td>
          .
          .
          .
          <!-- /ko -->
          <!-- ko if: $variables.varSelectedTabSpan === "secondTab" -->
          <td>
            <oj-bind-text value="[[row.data.city]]"></oj-bind-text>
          </td>
          <td>
            <oj-bind-text value="[[row.data.state]]"></oj-bind-text>
          </td>
          <td>
            <oj-bind-text value="[[row.data.company]]"></oj-bind-text>
          </td>
          .
          .
          .
          <!-- /ko -->
        </tr>
      </template>
Note: in the above examples, the three dots "..." signifies that you have to continue with adding the rest of the templates and/or tr, td elements for each table field.
As shown above, I have added two buttons under the Actions column - edit and delete. If you notice in the HTML script you will see that for both edit and delete buttons, I have defined the id property of the button differently. The reason here is I want to enable the edit and delete buttons only for the row which I have selected currently. All other rows' edit and delete buttons should be disabled since they are not in focus or not in consideration at the moment.
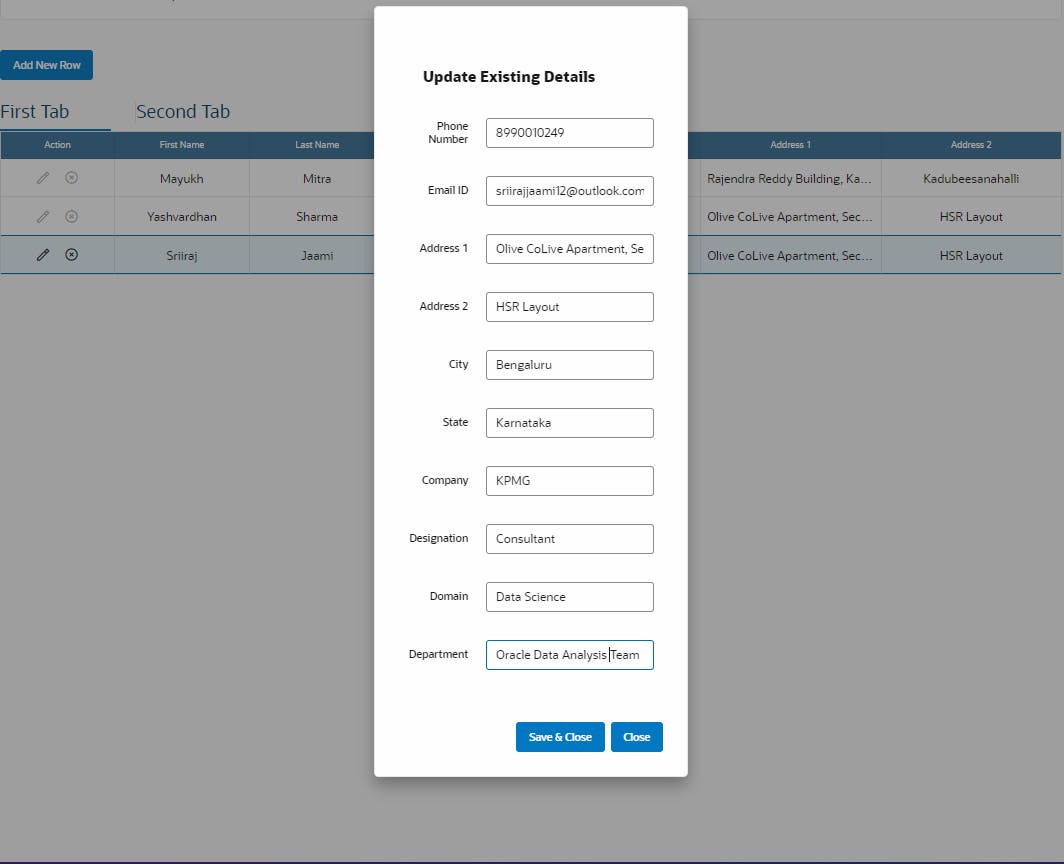
Till this point, you have made changes in your JET Table structure, and you have defined a variable to populate table columns and bind/map it with the table, the next item for you to do is to add oj-dialog component in your HTML script. This component will help you to update record sections like phone number, email, city, state, company etc. and save the updated value in ADP. Add one oj-dialog component which will have a header section, body and footer section as shown below. Once you have added oj-dialog component, map events corresponding to each field that you wish to update. Make sure the updated values are stored in the same variable which we have used below to store the current row in first-selected-row action chain.
<oj-dialog id="dialogUpdateRow" style="display: none; width: auto" dialog-title="Update Details"
  resize-behavior="none" cancel-behavior="none" drag-affordance="title-bar">
  <div slot="header" class="oj-dialog-header">
    <div style="text-align: center;">
      <h6>Update Existing Details</h6>
    </div>
  </div>
  <div slot="body">
    <oj-validation-group id="validationgroupEditRows">
      <oj-form-layout direction="row" label-edge="start">
        <oj-input-text id="inputtextPhoneNumberValue" label-hint="Phone Number" required="true"
          class="oj-form-control-width-sm" value="{{ $page.variables.varEditRowDetails.contactNumber }}"
          on-value-changed="[[$listeners.inputtextPhoneNumberValueValue]]"></oj-input-text>
        <oj-input-text virtual-keyboard="email"
          validators='[{"type":"regexp", "options":{"pattern":"([a-zA-Z0-9_\\-\\.]+)@([a-zA-Z0-9_\\-\\.]+)\\.([a-zA-Z]{2,5})", "hint":"Enter an email address.", "messageDetail": "Value must be of the form xxx@xxx.xx"}}]'
          value="{{ $page.variables.varEditRowDetails.emailID }}" class="oj-form-control-width-sm" required="true"
          label-hint="Email ID" id="inputtextEditEmailID" on-value-changed="[[$listeners.inputtextEditEmailIDValue]]">
        </oj-input-text>
        .
        .
        .
        .
      </oj-form-layout>
    </oj-validation-group>
  </div>
  <div slot="footer">
    <oj-button id="buttonSaveEdit" chroming="callToAction" on-oj-action="[[$listeners.buttonSaveEditAction]]">Save & Close</oj-button>
    <oj-button id="buttonCloseEdit" chroming="callToAction" on-oj-action="[[$listeners.buttonCloseEditAction]]">Close</oj-button>
  </div>
</oj-dialog>
Note: in the above example, the three dots "..." signifies that you can add the remaining fields depending on what other fields you want to update.
In the footer section of this dialog, we will add two oj-button components and define them as - Save & Close and Close. For now, we will not bind any event chains to these buttons as we have to complete the corresponding dependencies.
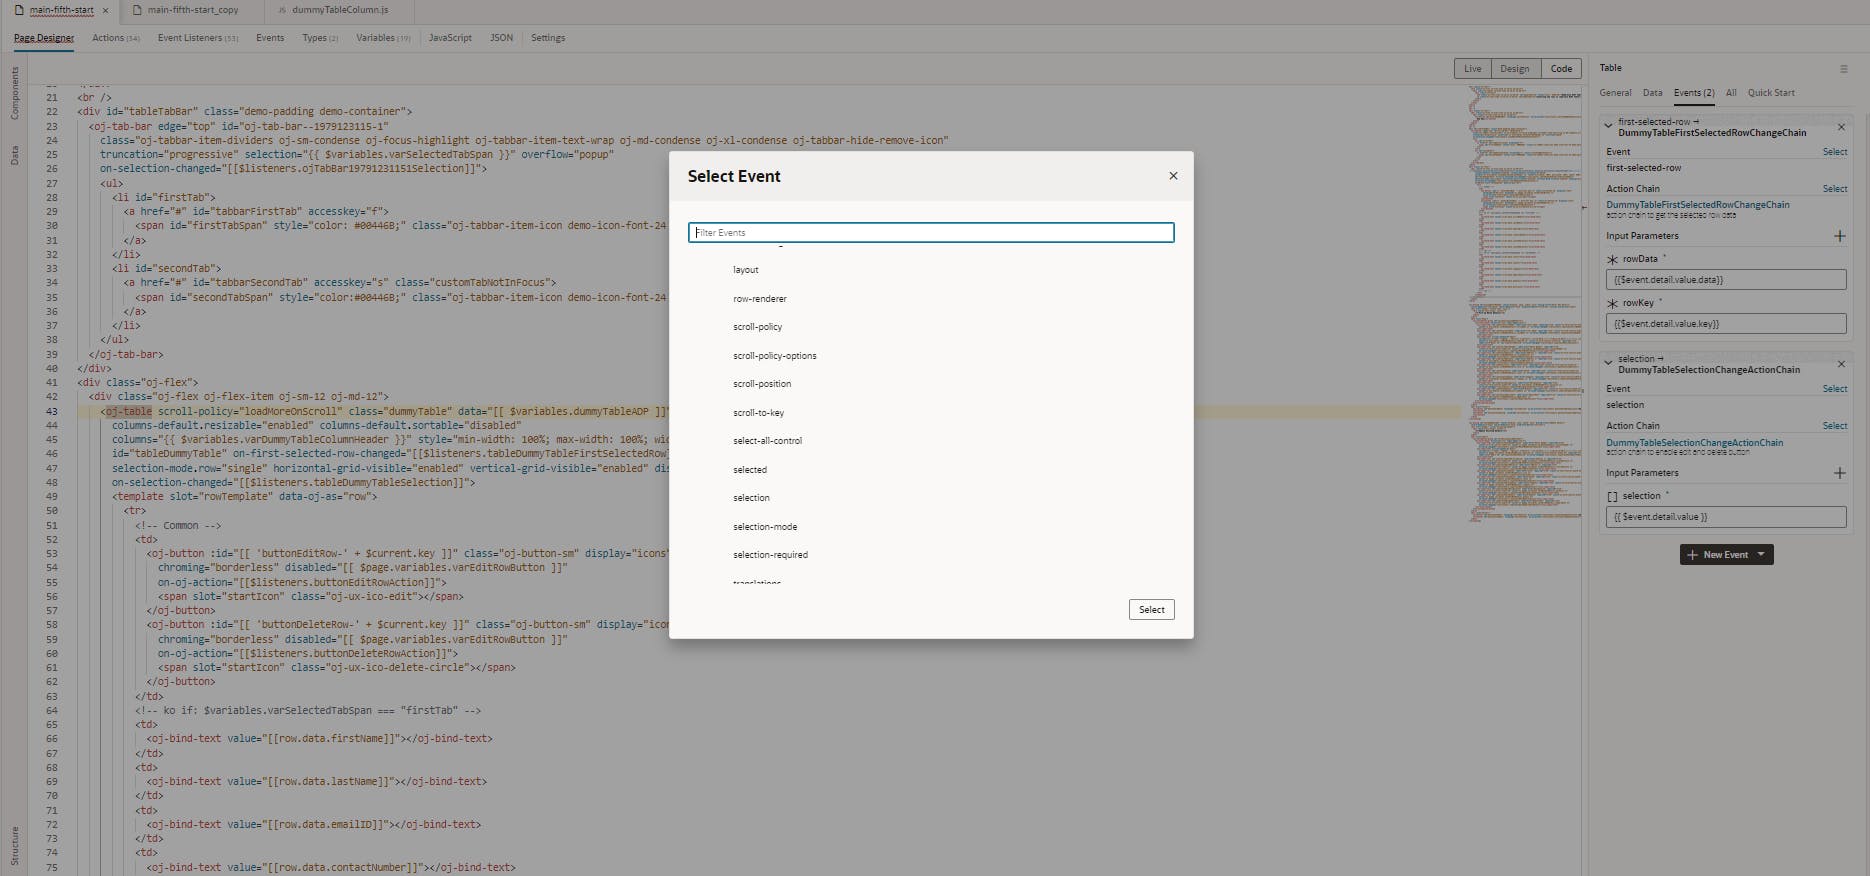
Once you have added oj-dialog component in your HTML script, the next thing that we are going to do is we will bind two events to JET Table and one event to each button. For the JET table, we are going to use the first-selected-row event and selection event. First Selected Row is easy to add since it is available in the list of New Event. For selection one, you have to click on New Custom Event and then select the selection event under the Property Changes events list.
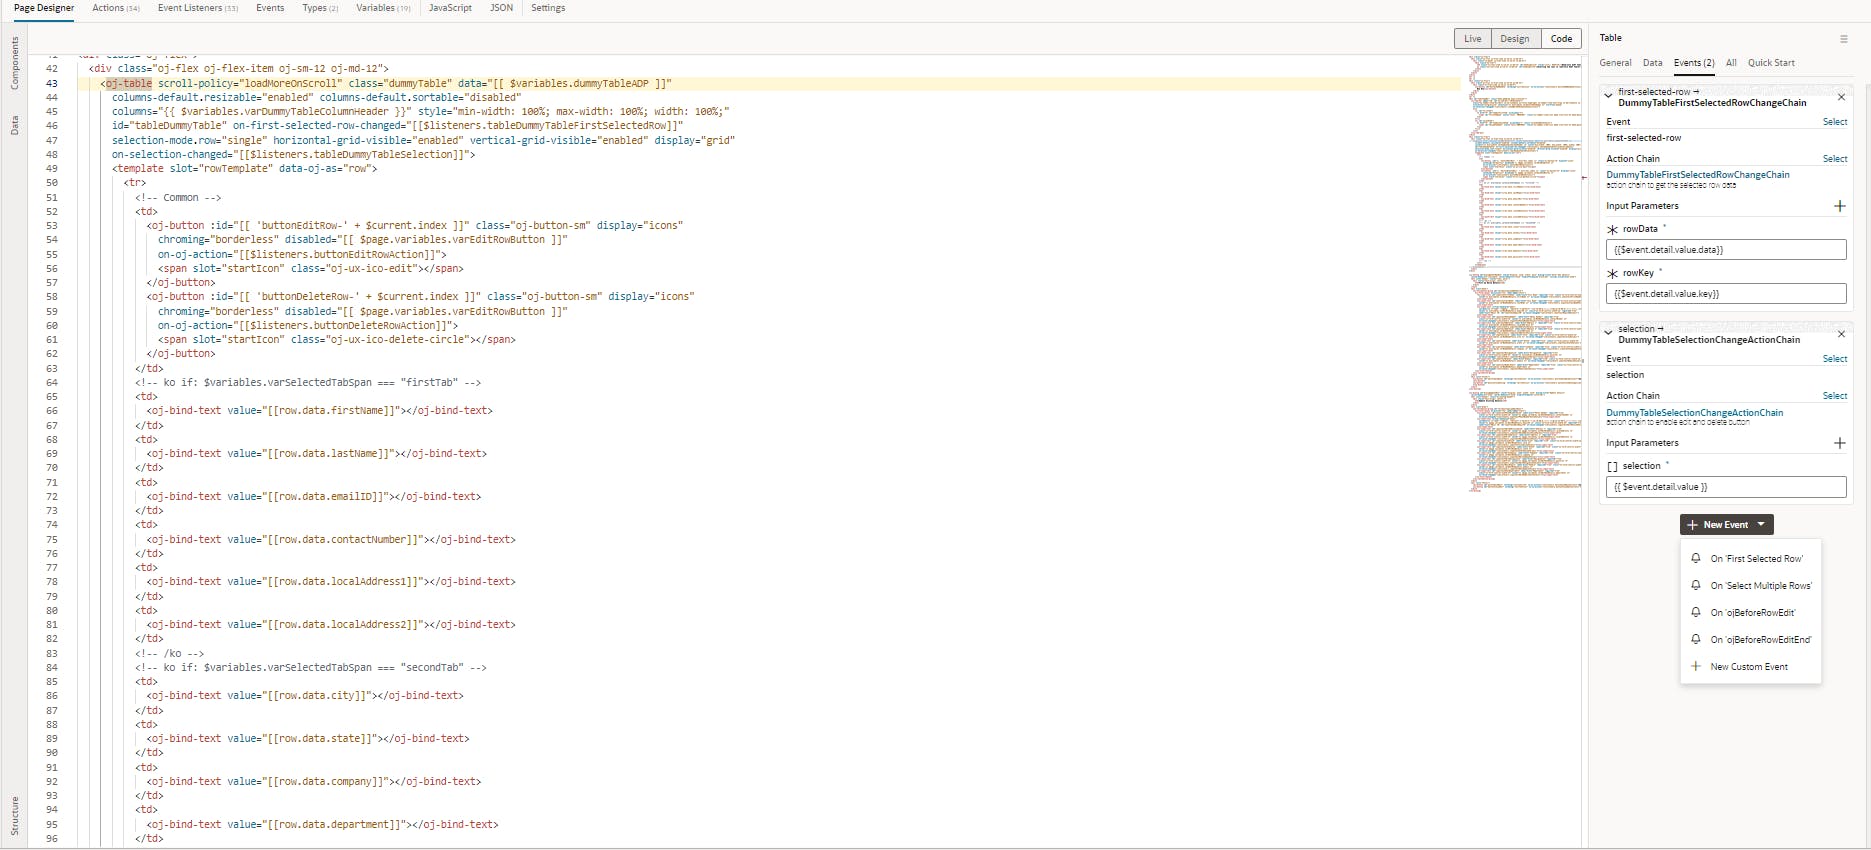
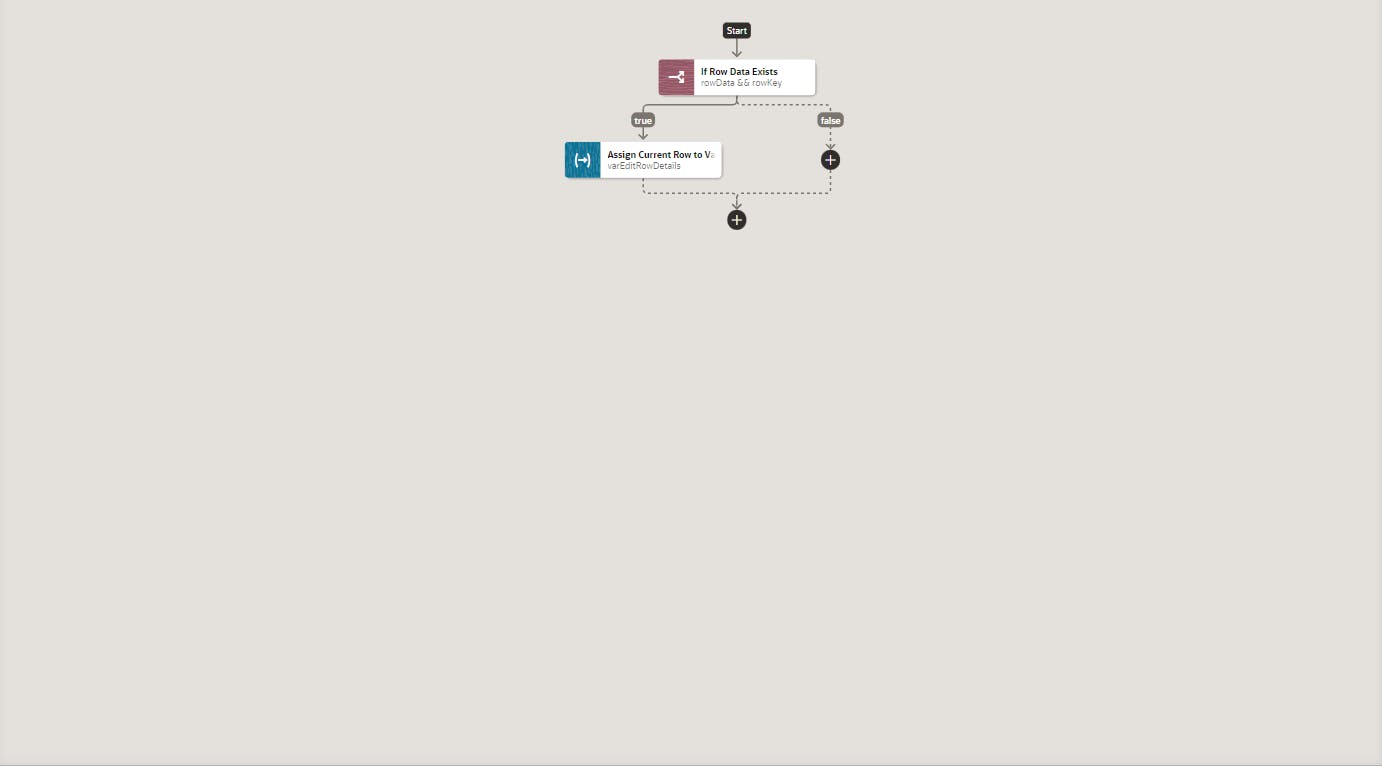
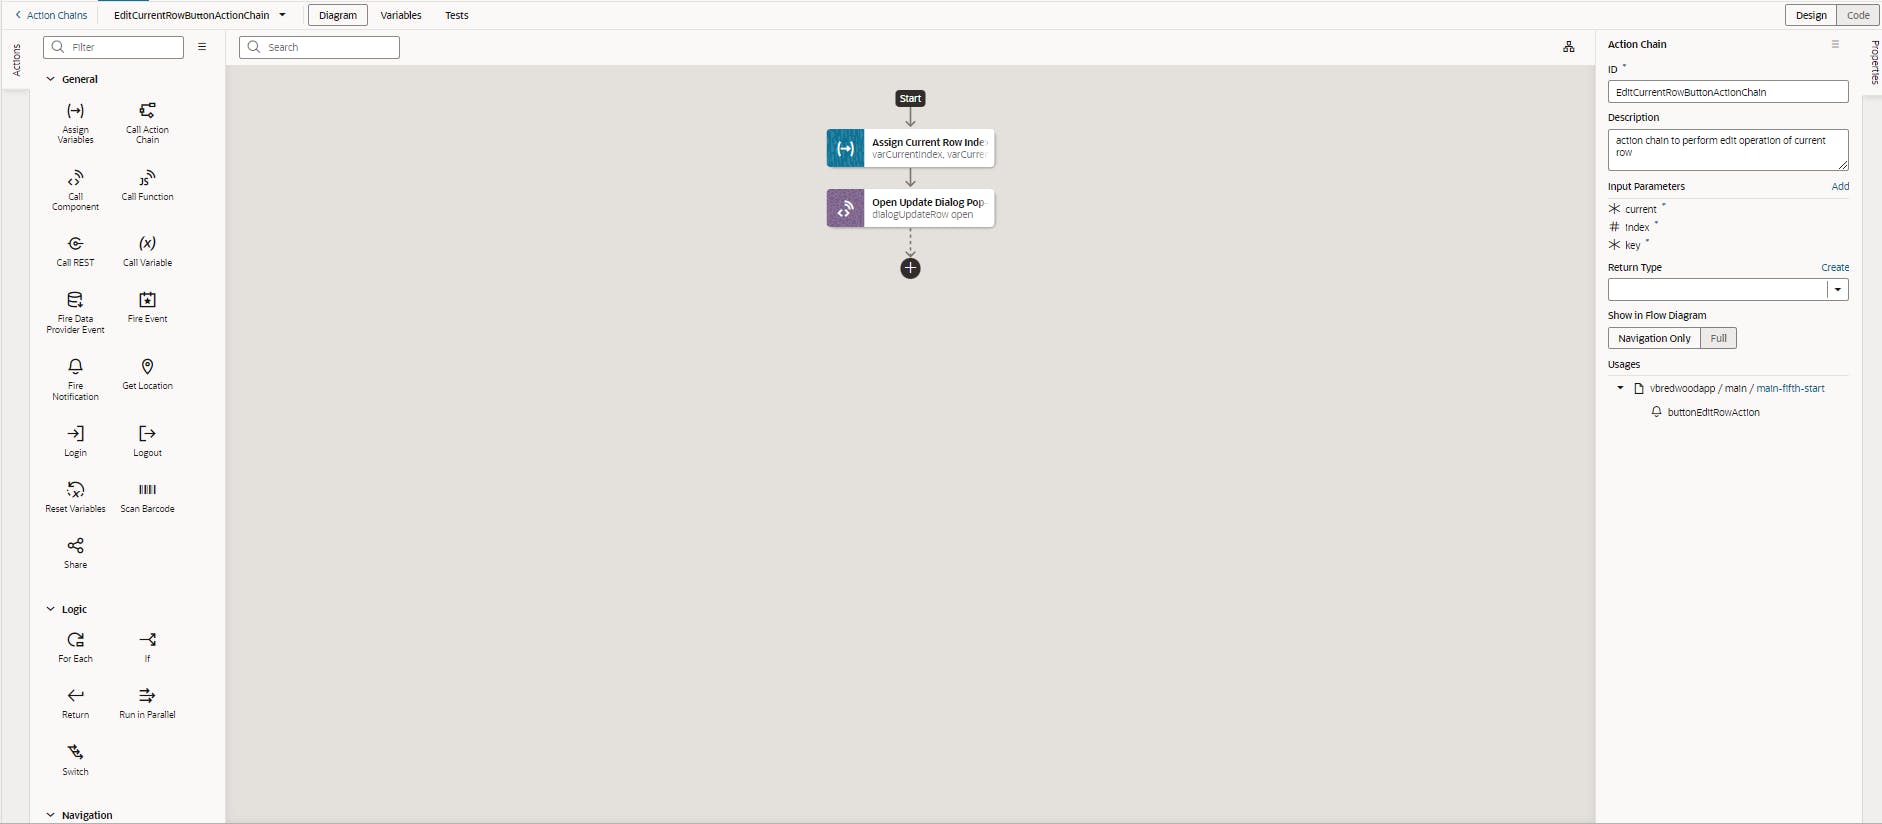
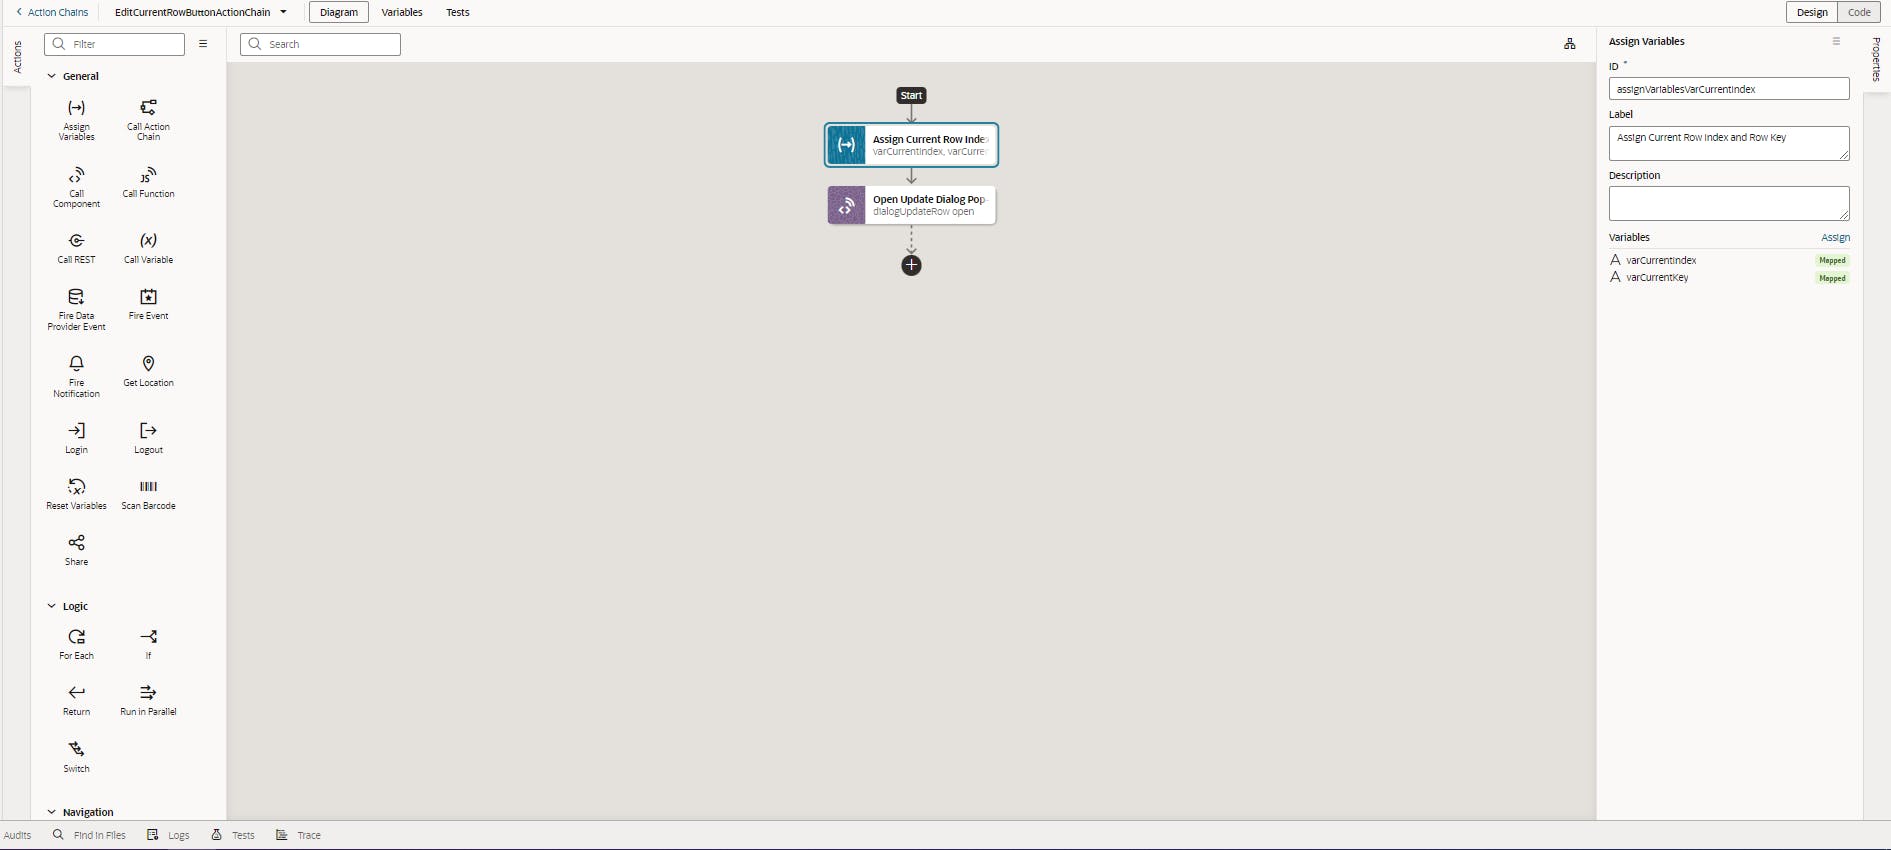
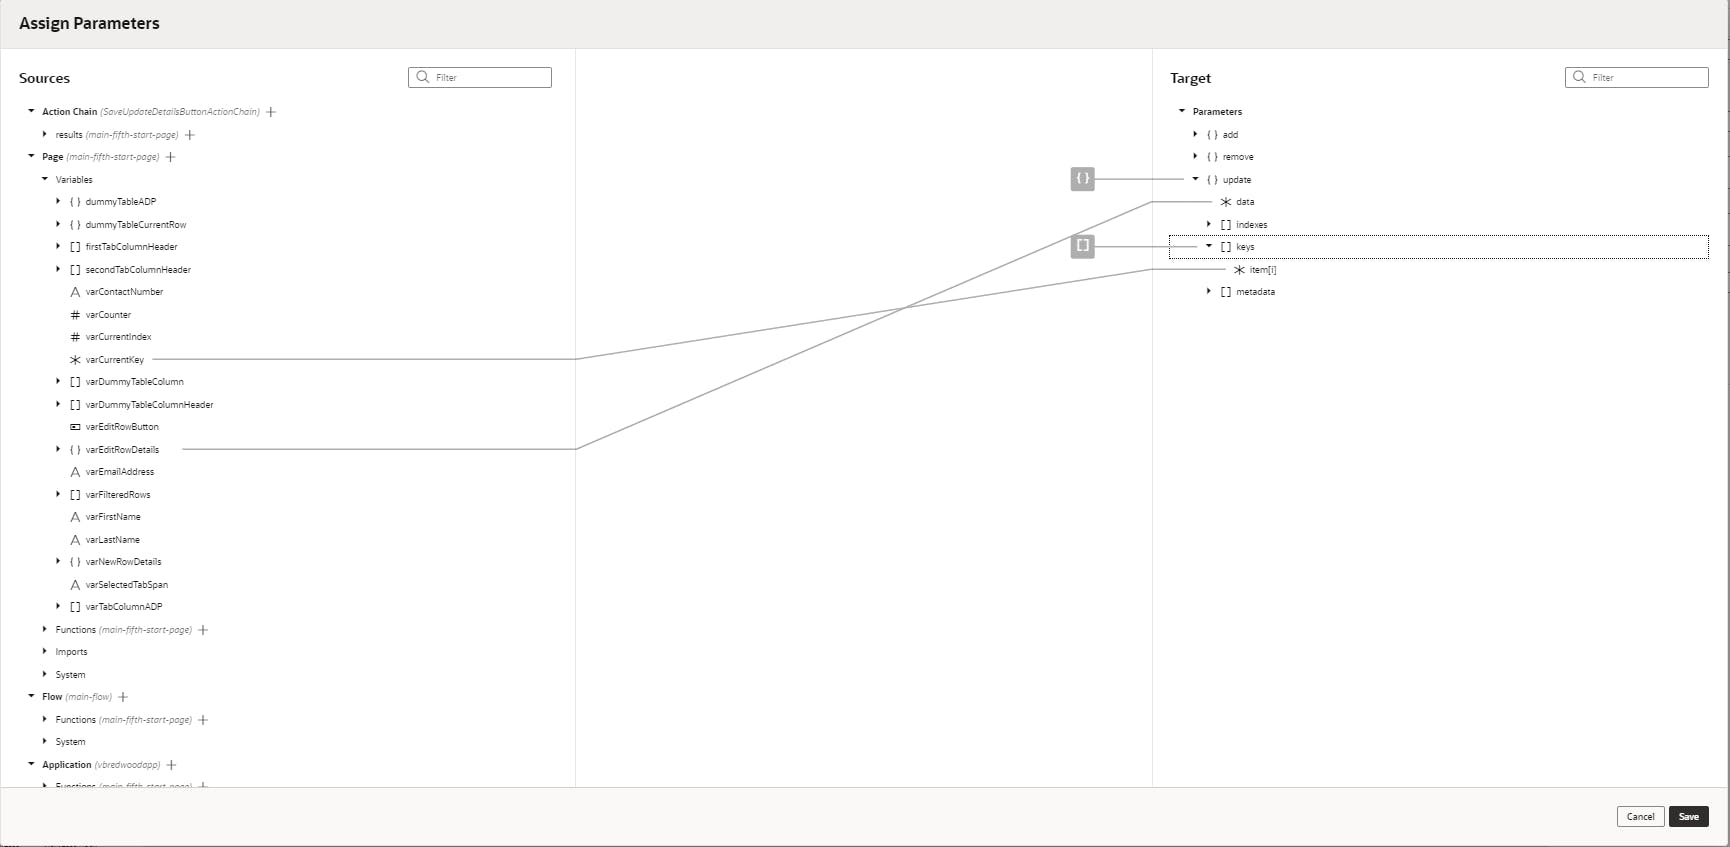
Once you have added these events, lets go back to first selected row action chain. Inside this action chain, we will assign the current row to an object-type variable that has the same set of properties/fields as our table ADP has. We will use this variable in our Edit pop-up dialog.
After this, before you go to selection action chain, come to JavaScript section of visual builder and add this JS function. We will use this JS function in selection action chain to enable and disable edit and delete button.
PageModule.prototype.enableEditDeleteButton = function(currentIndex, totalRecords) {
    let i;
    for(i = 0; i < totalRecords; i++) {
      document.getElementById("buttonEditRow-" + i).disabled = true;
      document.getElementById("buttonDeleteRow-" + i).disabled = true;
    }
    document.getElementById("buttonEditRow-" + currentIndex).disabled = false;
    document.getElementById("buttonDeleteRow-" + currentIndex).disabled = false;

  };
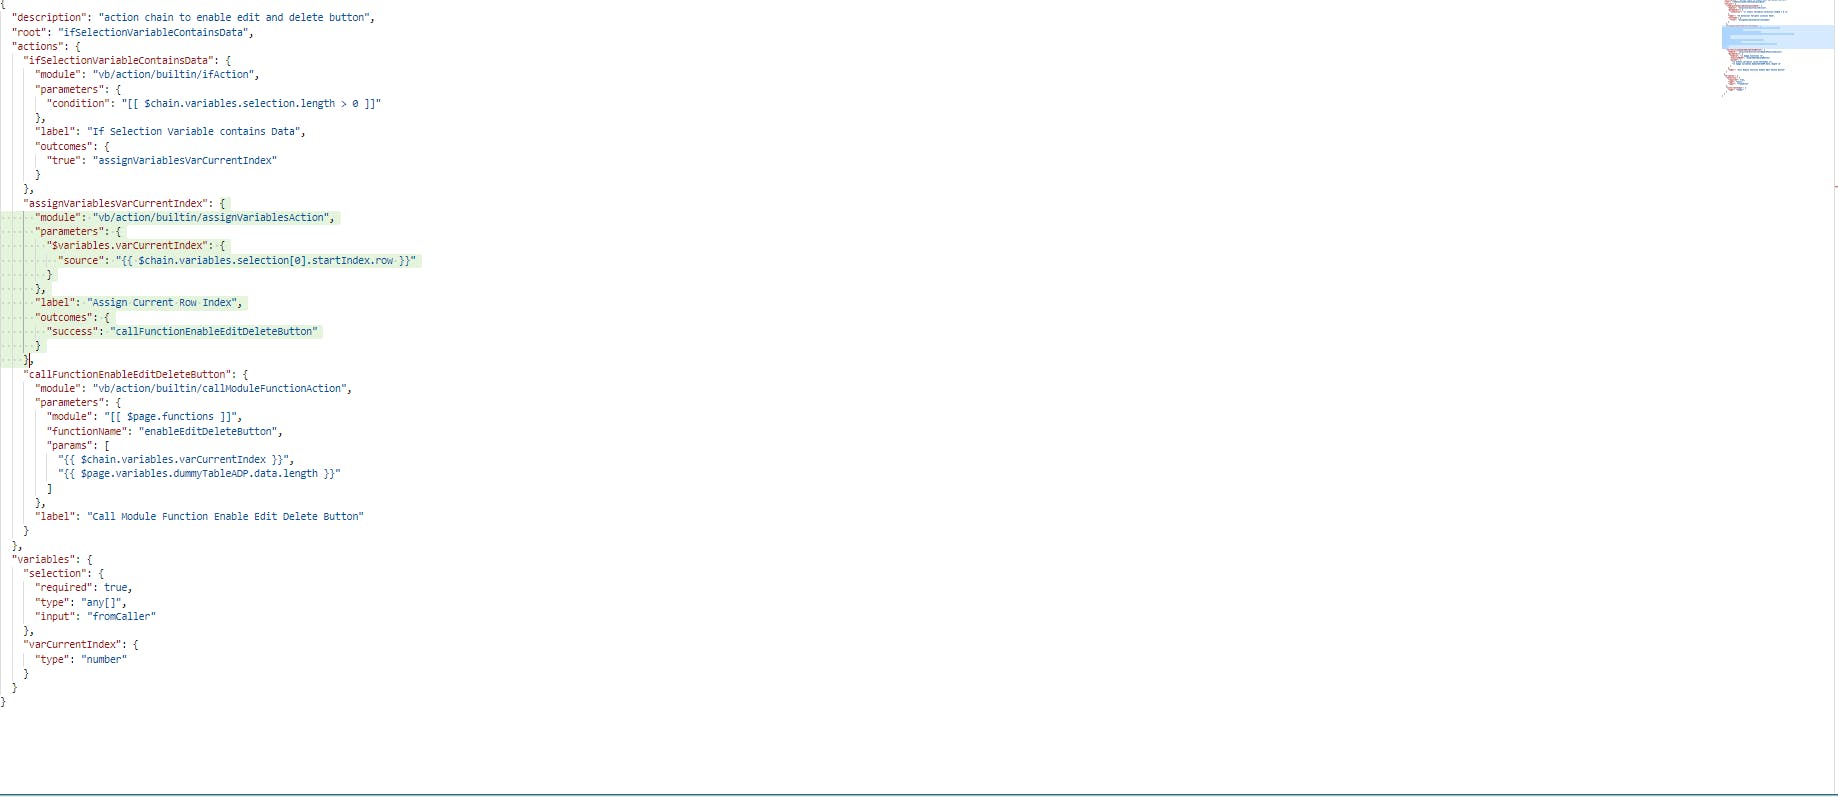
After defining your JS function, come to the selection action chain and call this JS function from within the action chain as shown below. In the same action chain, assign the current index of the row to a page-level variable varCurrentIndex which will be of number type. Pass the value stored in varCurrentIndex to the above JS function as a function parameter along with the length of the table data (Fig. 8).

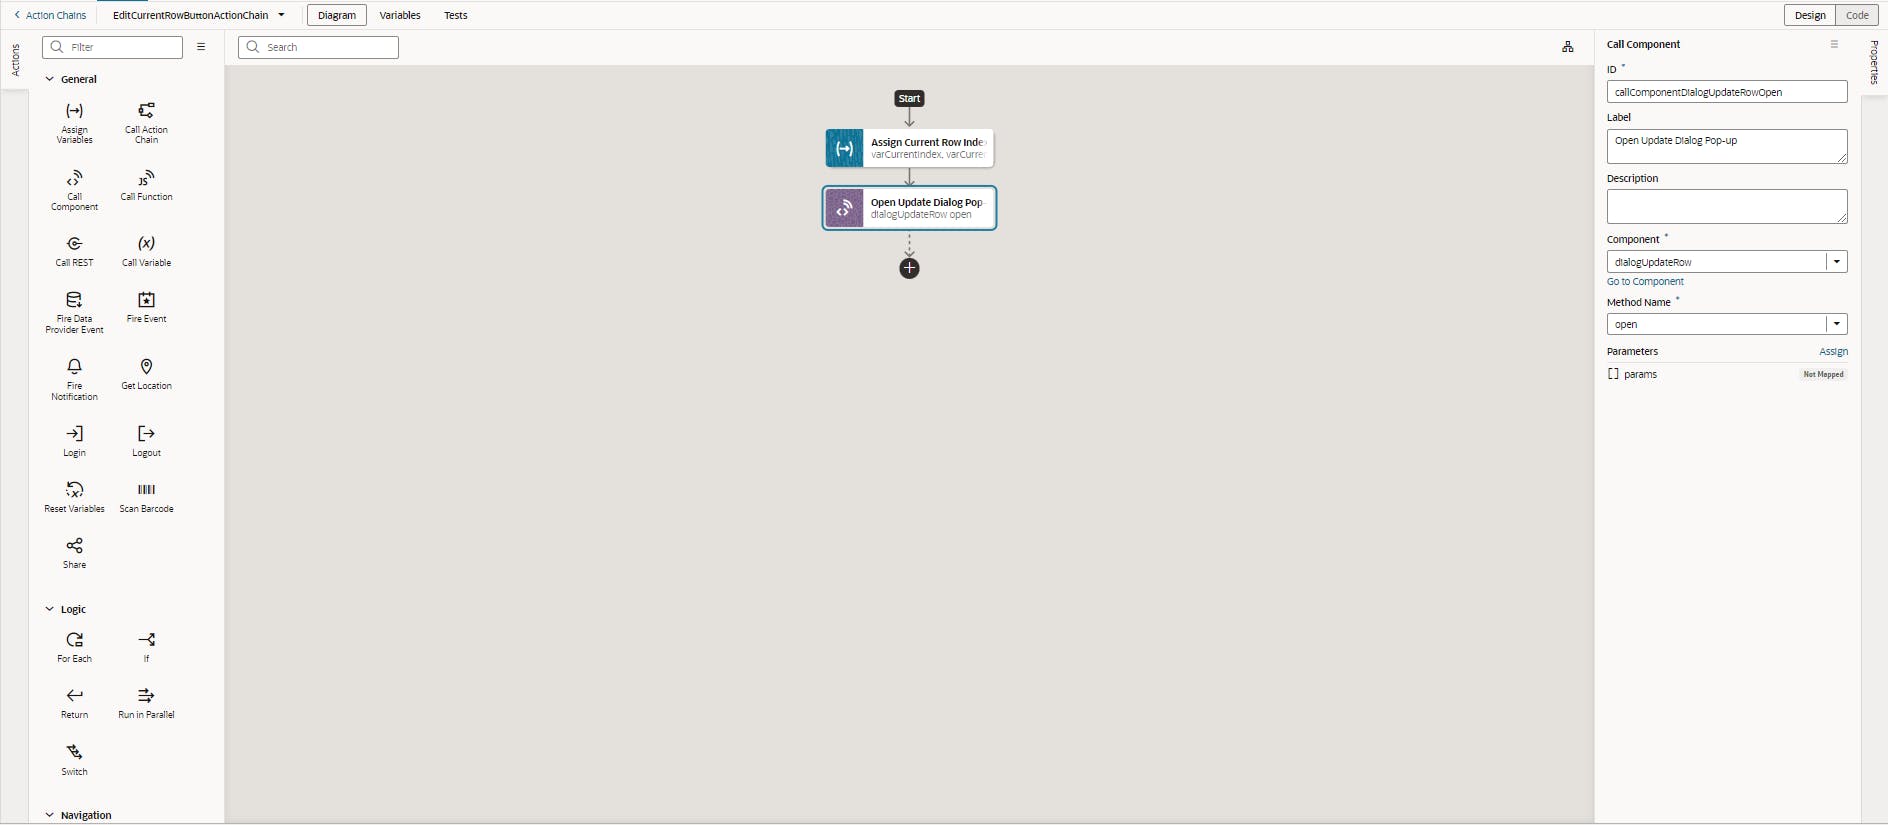
After this, we will now bind events with our edit and delete button. Bind the ojAction event to the edit button and from within the defined action chain assign the current row key value to the page-level variable and use Call Component action to open the Edit pop-up dialog.
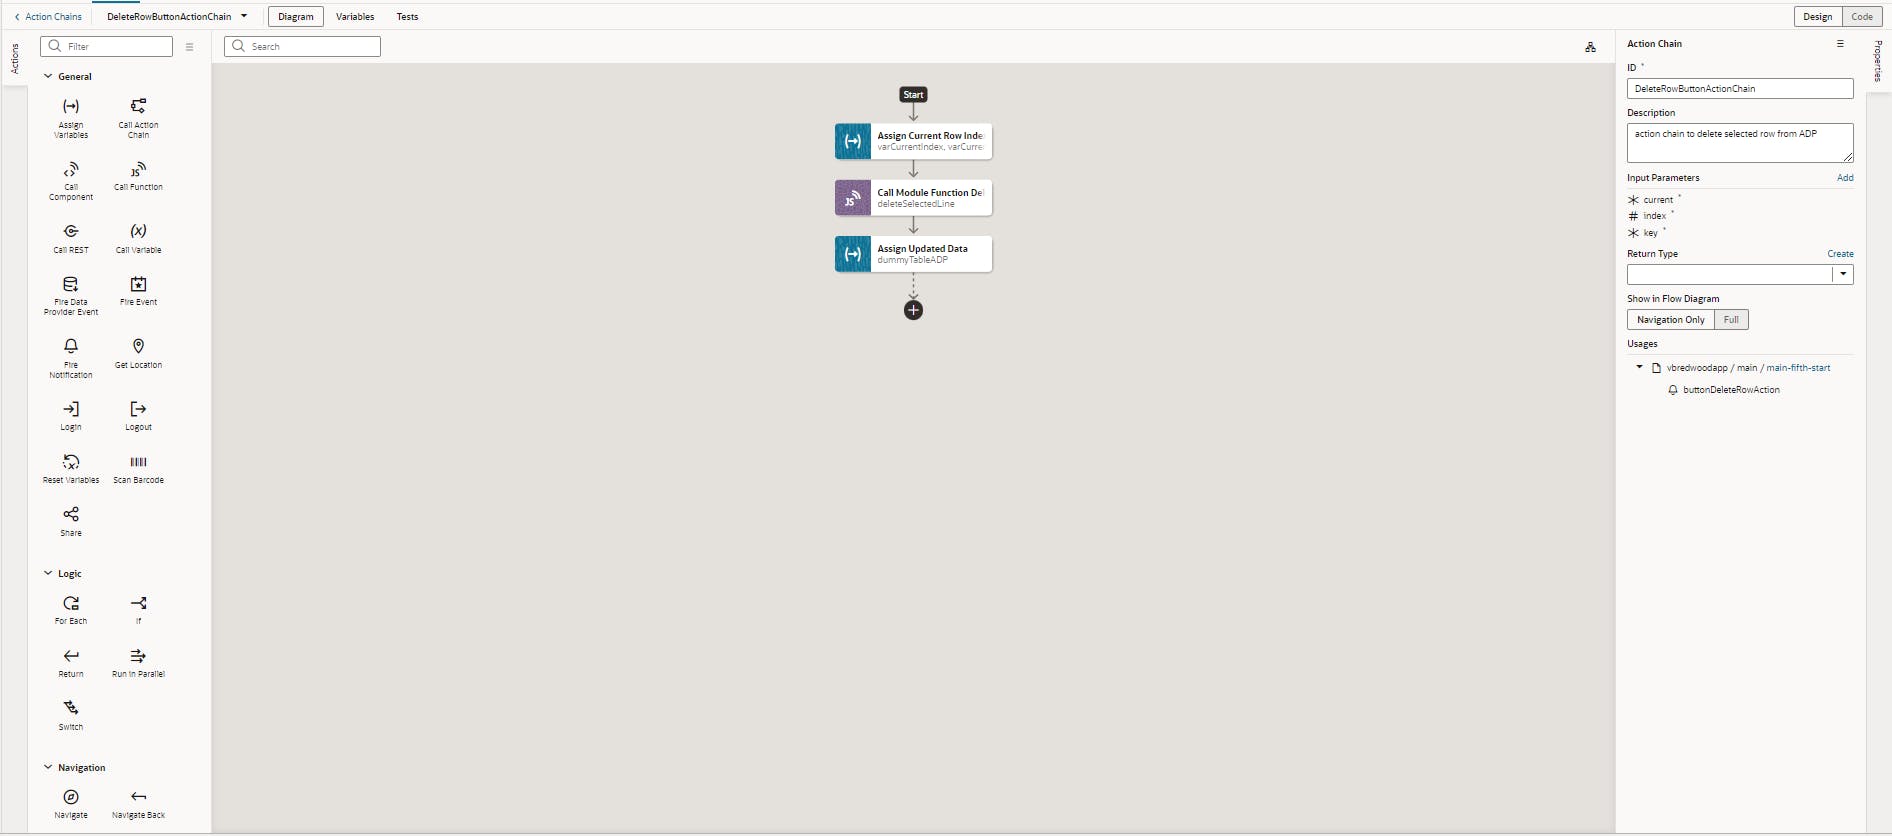
Then, we will bind the ojAction event to the delete button. Inside the delete action chain, first we will assign the current key and current index of a row to page-level variables. Then we will call a JS function that will remove the row from ADP with the help splice method of the JavaScript array. This function accepts the ADP data and current index value as function parameters. After this, we will map the response of JS function to our dummyTable ADP variable. Don't forget to set the Reset Target to empty while mapping JS function's response to ADP variable.
PageModule.prototype.deleteSelectedLine = function(tableData, currentIndex) {
    console.log("delete line: " + currentIndex);
    tableData.splice(currentIndex, 1);
    console.log("table data after delete: ", tableData);
    return tableData;
  };
At last, we will come to our Edit pop-up dialog's Save & Close and Close buttons. We will map two ojAction events to these buttons. In case of Save & Close action chain, use fire data provider event action to update current row of the table. Once you have updated the row use call component event to close the Edit pop-up dialog.

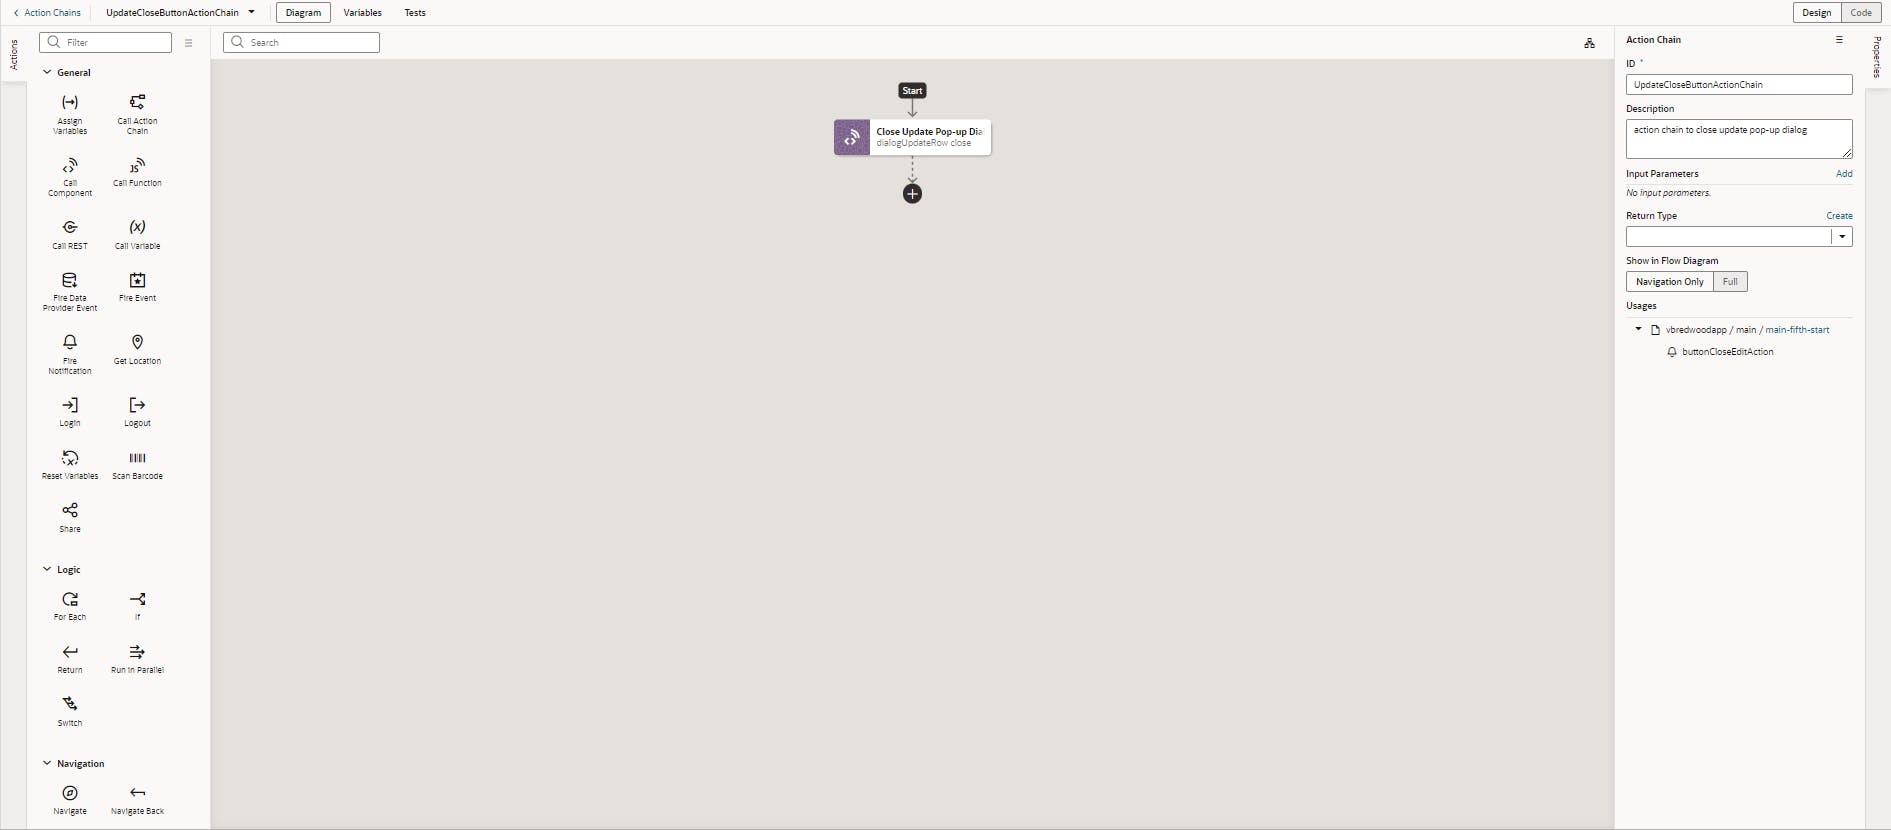
In case of Close button, simply use call component event to close the Edit pop-up dialog.
Now, we are set to test the changes. Run the application by clicking on the preview button and perform insertion, updation and deletion operations.
Insertion Operation:
Edit Operation: click on the pencil icon button after selecting a row

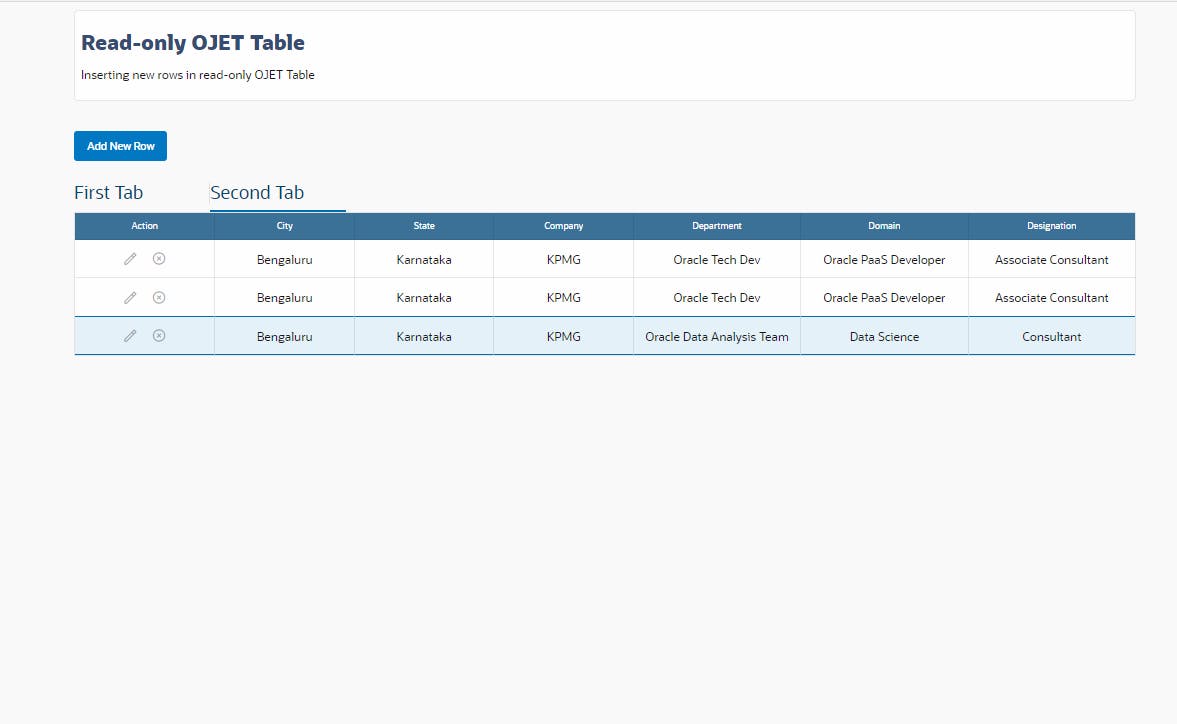
Delete Operation: click on the delete icon button to delete a row.
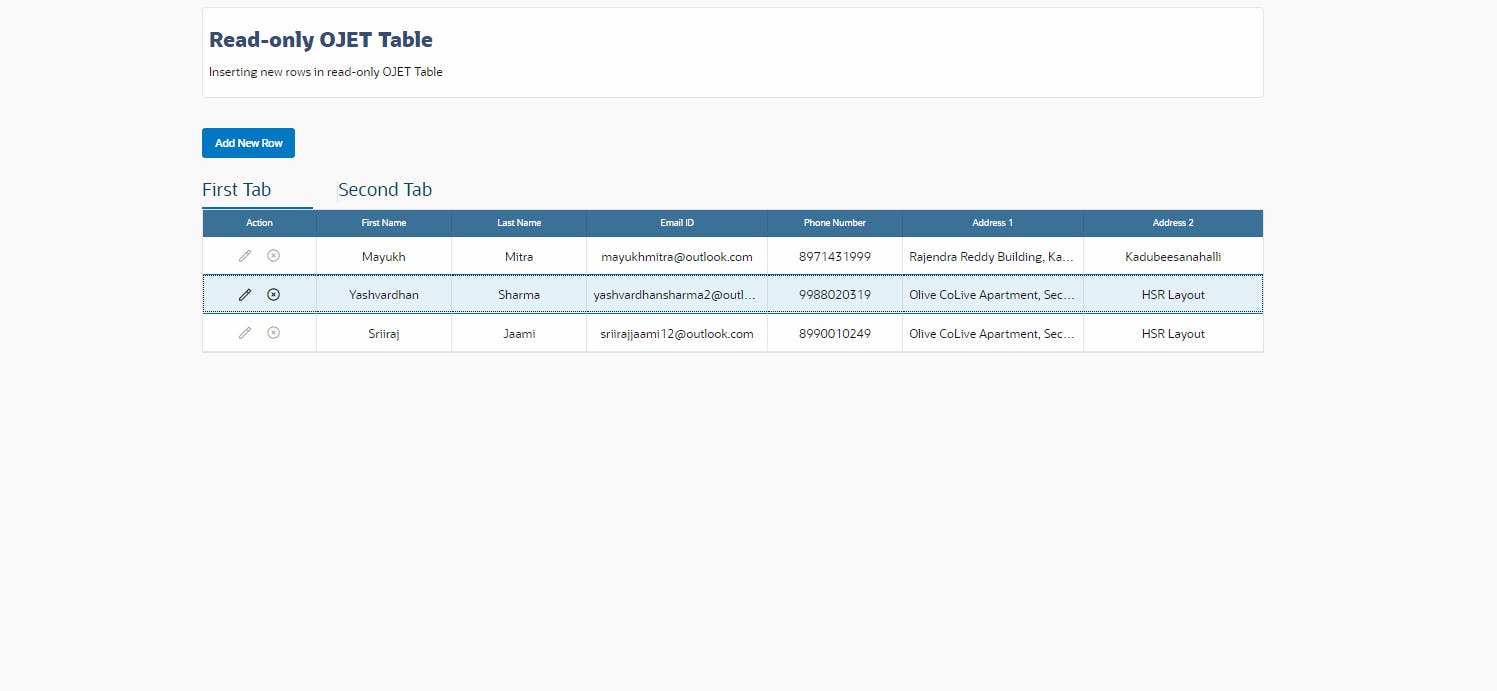
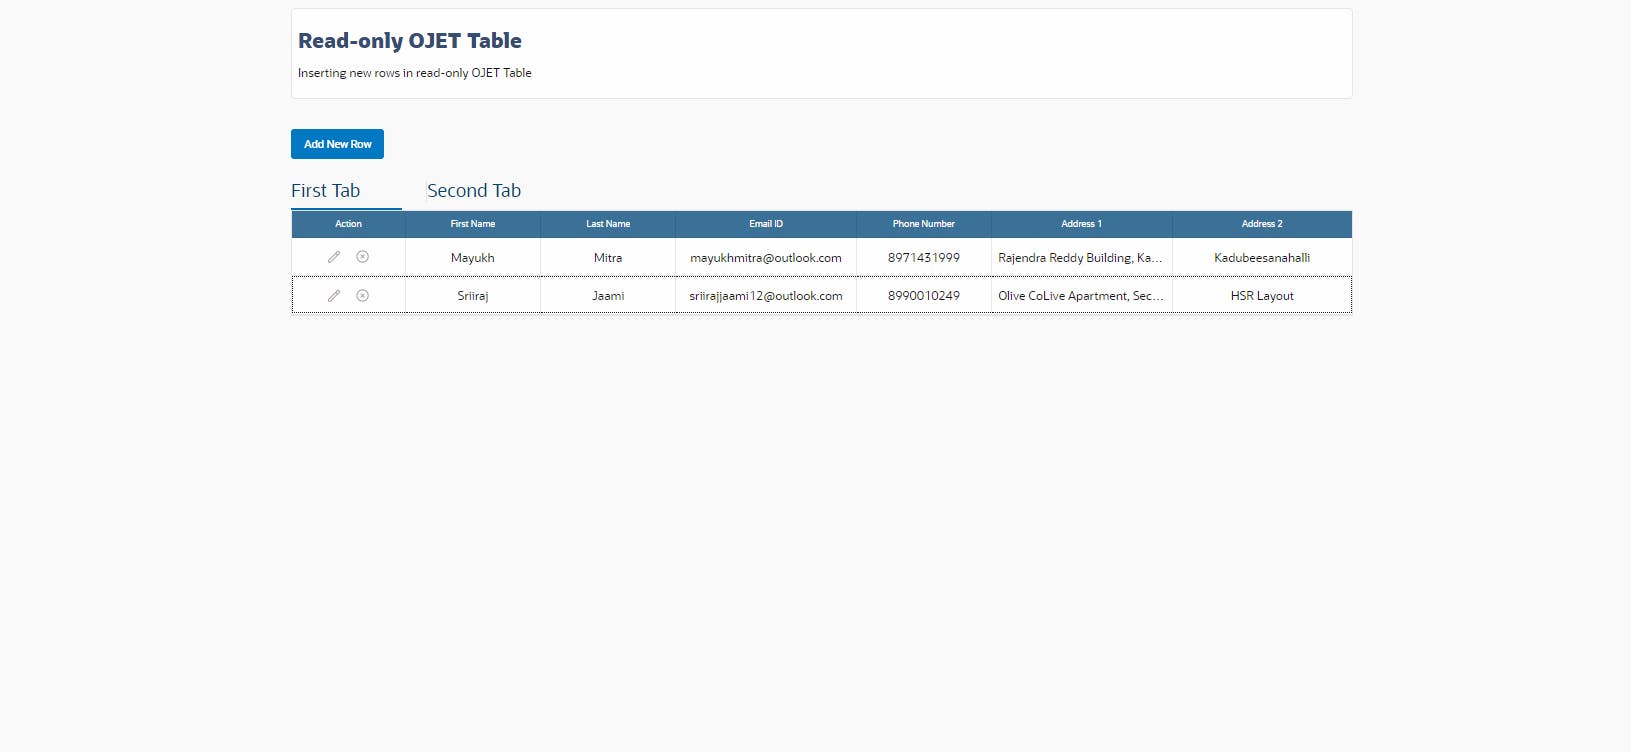
From the above examples, we can see that all three operations - insert, update and delete are working properly without any issues. Of course, to check if any issue arises while testing, we have to open the console window of Developer Tools of Browser. It helps us to understand where what has gone wrong and where to fix needs to be applied.
Try it from your end and let me know if it works.
Happy Learning :)